
Install PhyOS on Jetson Nano Orin Devkit
Overview
Section titled “Overview”This guide walks you through installing PhyOS 5 on the NVIDIA Jetson Nano Orin Devkit. The process involves two main parts:
- Initial Setup (SPI Bootloader) - One-time operation to program the SPI bootloader (required for fresh devices)
- PhyOS Installation - Flash and install PhyOS from microSD card
Prerequisites
Section titled “Prerequisites”For SPI bootloader flashing (first-time setup only)
Section titled “For SPI bootloader flashing (first-time setup only)”- Ubuntu Linux host (Ubuntu 22.04 or later recommended)
- NVIDIA Jetson Nano Orin Devkit
- USB-C data cable (device OTG port to Ubuntu host)
- Power adapter for the Jetson
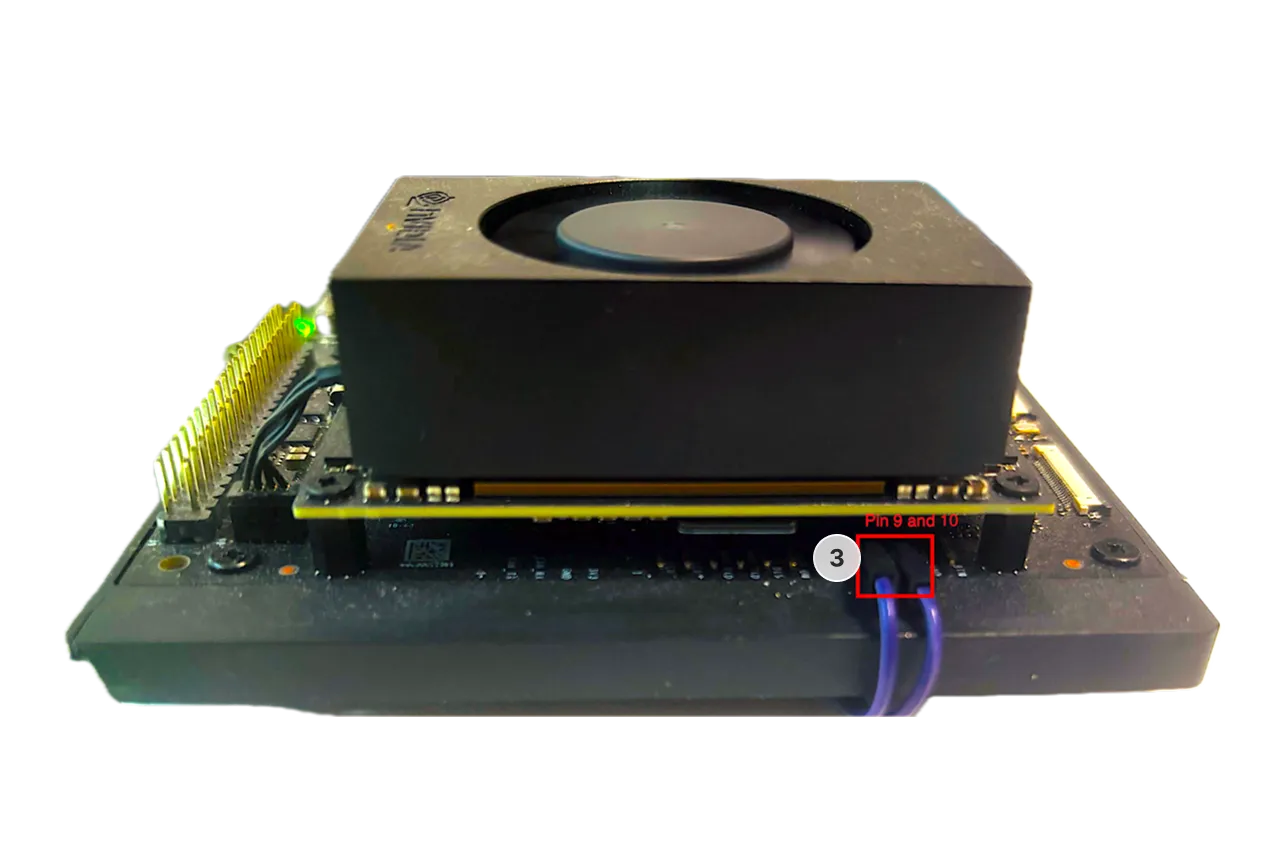
- Jumper cap or wire (for recovery mode pins 9 and 10)
- SPI flash package for Jetson Nano Orin Devkit
For PhyOS installation
Section titled “For PhyOS installation”- microSD card (minimum 32GB, Class 10 or better recommended)
- microSD card reader
- Computer running Windows, macOS, or Linux (for flashing PhyOS to SD card)
- DisplayPort monitor
- USB keyboard
- Internet connection
Part 1: Initial Setup (SPI Bootloader)
Section titled “Part 1: Initial Setup (SPI Bootloader)”Step 1: Prepare Ubuntu host
Section titled “Step 1: Prepare Ubuntu host”On your Ubuntu 22.04 host, install required packages:
sudo apt updatesudo apt install -y device-tree-compiler usbutilsStep 2: Download SPI flash package
Section titled “Step 2: Download SPI flash package”- Download the SPI flash package for Jetson Nano Orin Devkit to your Ubuntu host
- Extract the package:
Terminal window cd ~/Downloadstar -xf <spi_flash_package>.tar.*cd <spi_flash_package_directory>
Step 3: Enter Recovery Mode
Section titled “Step 3: Enter Recovery Mode”- Power off the Jetson Nano Orin Devkit completely
- Locate the Recovery header on the board
- Identify pins 9 and 10 on the Recovery header (refer to the device documentation or image)
- Short pins 9 and 10 using a jumper cap or wire
- Connect a USB-C cable from the DevKit USB-C (device/OTG) port to your Ubuntu host
- Insert a microSD card into the Jetson (any card will work for this step)
- Apply power to the DevKit while keeping pins 9 and 10 shorted
- Verify the device is in Recovery Mode by running on your Ubuntu host:
You should see:
Terminal window lsusb | grep -i nvidiaNVIDIA Corp. APX
Step 4: Flash SPI bootloader
Section titled “Step 4: Flash SPI bootloader”- In the extracted SPI flash package directory, run:
Terminal window sudo sh doflash --spi-only - Wait for the script to complete (may take several minutes)
- Do not disconnect power or USB during flashing
- When complete, you’ll see a success message
Step 5: Complete initial setup
Section titled “Step 5: Complete initial setup”- Power off the device
- Remove the jumper from pins 9 and 10
- Disconnect the USB-C cable from the Ubuntu host
The initial SPI bootloader setup is now complete. You only need to perform this once.
Part 2: Install PhyOS
Section titled “Part 2: Install PhyOS”Once the SPI bootloader is flashed (or if you’re performing a repeat installation), you can now install PhyOS to the device’s internal drive.
Download and prepare installation media
Section titled “Download and prepare installation media”- Download the latest PhyOS installer for Jetson Orin Nano DevKit
- Write the PhyOS image to a microSD card using Balena Etcher or Raspberry Pi Imager
Install PhyOS to internal drive
Section titled “Install PhyOS to internal drive”- Power off the Jetson Nano Orin completely and disconnect power
- Insert the prepared microSD card into the slot on the underside of the board
- Connect your DisplayPort monitor
- Connect a USB keyboard (required for installation)
- Reconnect power to perform a cold boot
- Immediately press F11 at startup to open the boot menu
- Select the SD card from the boot menu using arrow keys
- Press Enter to boot from the SD card
- Follow the on-screen instructions to flash the internal drive with PhyOS
- The installer will guide you through the process
- This writes PhyOS to the device’s internal storage
- Wait for the installation to complete
- When prompted that installation is successful, power off the device
- Disconnect power and remove the microSD card
- Reconnect power - the device will now boot PhyOS from internal storage
Connect device to PhyStack
Section titled “Connect device to PhyStack”After PhyOS boots from internal storage:
- You should see the PhyOS splash screen
- The device will display a connection screen
- Note the Serial Number displayed in the top-left corner of the screen
- In the PhyStack portal, navigate to the device connection section
- Enter the Serial Number in the Device Serial field
- Click the Connect device button
- The device will appear under Installations → Devices
Troubleshooting
Section titled “Troubleshooting”SPI bootloader flashing issues
Section titled “SPI bootloader flashing issues”APX device not visible in lsusb
Section titled “APX device not visible in lsusb”- Re-enter Recovery Mode by carefully repeating Step 3
- Ensure your USB-C cable supports data transfer (some cables are power-only)
- Try a different USB port on the Ubuntu host
- Check USB kernel logs immediately after plugging in the device:
Terminal window dmesg | tail -n 50
doflash —spi-only fails
Section titled “doflash —spi-only fails”- Confirm the device is in Recovery Mode and visible as
NVIDIA Corp. APXinlsusb - Verify prerequisites are installed:
device-tree-compiler - Ensure you’re running the command from inside the extracted SPI package directory
- Confirm you’re using sudo:
sudo sh doflash --spi-only - If it still fails, capture the full error output for support
PhyOS installation issues
Section titled “PhyOS installation issues”F11 boot menu doesn’t appear
Section titled “F11 boot menu doesn’t appear”- Ensure you press F11 immediately at startup
- Try pressing F11 repeatedly during boot
- If F11 doesn’t work, the SPI bootloader may not be flashed correctly
- Verify the SPI bootloader was successfully flashed in Part 1
Device won’t boot from microSD card
Section titled “Device won’t boot from microSD card”- Ensure the SPI bootloader was successfully flashed (Part 1)
- Verify the microSD card is fully inserted
- Press F11 and manually select the SD card from the boot menu
- Try re-flashing the PhyOS image to the SD card using Balena Etcher
- Test with a different microSD card (some cards are incompatible)
- Check that you downloaded the ARM64 version of PhyOS, not x86-64
Installer doesn’t appear after selecting SD card
Section titled “Installer doesn’t appear after selecting SD card”- Verify the PhyOS image was written successfully to the SD card
- Check that your DisplayPort monitor is connected properly
- Ensure the power supply provides adequate power (5V 4A minimum)
- Try a different microSD card
Installation to internal drive fails or freezes
Section titled “Installation to internal drive fails or freezes”- Ensure the Jetson has adequate cooling during installation
- Check that there’s sufficient space on the internal drive
- Try a different microSD card (Class 10 or better recommended)
- Wait at least 15 minutes before intervening (installation can be slow)
- If it continues to fail, re-flash the SPI bootloader and try again
Important notes
Section titled “Important notes”- Perform SPI flashing only once on fresh devices unless explicitly instructed otherwise
- Never interrupt power during SPI flashing - this can brick the device
- The SPI bootloader enables the Jetson to boot from the PhyOS SD card layout
- Keep your SPI flash package in a safe location in case you need to reflash in the future