
Install PhyOS on Advantech MIC-711-ON-3A1
Overview
Section titled “Overview”This guide walks you through installing PhyOS 5 on the Advantech MIC-711-ON-3A1 embedded system. The process involves two main parts:
- Initial Setup (SPI Bootloader): One-time operation to program the SPI bootloader (required for fresh devices)
- PhyOS Installation: Flash and install PhyOS from microSD card
The Advantech MIC-711-ON-3A1 is a compact fanless embedded computer with an ARM processor, making it ideal for running AI inference applications.
Prerequisites
Section titled “Prerequisites”For SPI bootloader flashing (first-time setup only)
Section titled “For SPI bootloader flashing (first-time setup only)”- Ubuntu Linux host (Ubuntu 22.04 or later recommended)
- Advantech MIC-711-ON-3A1 device
- USB-C data cable (device OTG port to Ubuntu host)
- Power adapter for the device
- Small screwdriver (to access REC button)
- SPI flash package for MIC-711-ON-3A1
For PhyOS installation
Section titled “For PhyOS installation”- USB flash drive (minimum 16GB, USB 3.0 recommended)
- Computer running Windows, macOS, or Linux (for flashing PhyOS to USB drive)
- HDMI display or monitor with DisplayPort
- USB keyboard
- Internet connection
Part 1: Initial Setup (SPI Bootloader)
Section titled “Part 1: Initial Setup (SPI Bootloader)”Step 1: Prepare Ubuntu host
Section titled “Step 1: Prepare Ubuntu host”On your Ubuntu 22.04 host, install required packages:
sudo apt updatesudo apt install -y device-tree-compiler usbutilsStep 2: Download SPI flash package
Section titled “Step 2: Download SPI flash package”- Download the SPI flash package for MIC-711-ON-3A1 to your Ubuntu host
- Extract the package:
Terminal window cd ~/Downloadstar -xf <spi_flash_package>.tar.*cd <spi_flash_package_directory>
Step 3: Enter Recovery Mode
Section titled “Step 3: Enter Recovery Mode”- Power off the MIC-711-ON-3A1 completely
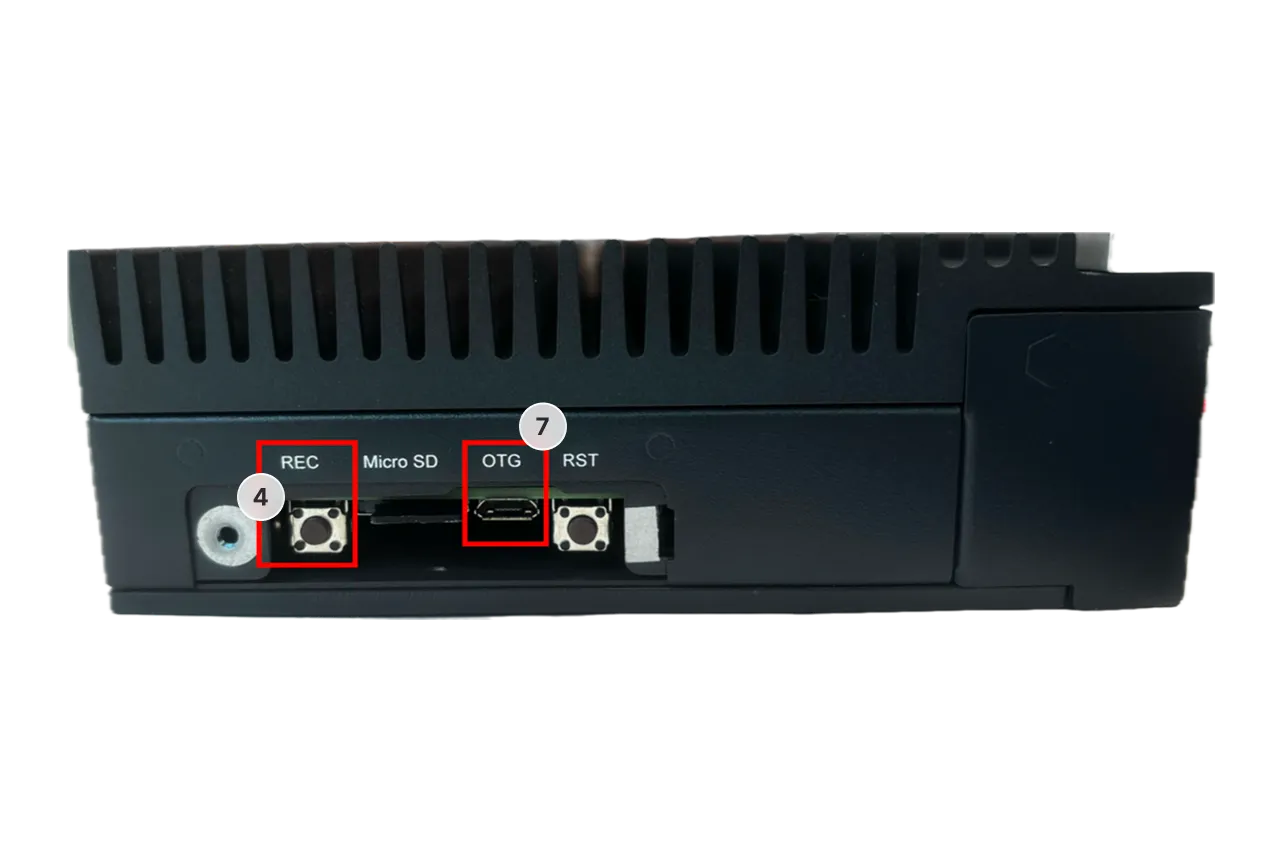
- Unscrew the lid of the device to access the internal REC button
- Locate the REC button on the board (refer to device documentation or image)
- Press and hold the REC button
- While holding the REC button, connect the power adapter to the device
- Continue holding the REC button for about 5 seconds, then release
- Connect a USB-C cable from the device’s OTG/USB port to your Ubuntu host
- Insert a microSD card into the device (any card will work for this step)
- Verify the device is in Recovery Mode by running on your Ubuntu host:
You should see:
Terminal window lsusb | grep -i nvidiaNVIDIA Corp. APX
Step 4: Flash SPI bootloader
Section titled “Step 4: Flash SPI bootloader”- In the extracted SPI flash package directory, run:
Terminal window sudo sh doflash --spi-only - Wait for the script to complete (may take several minutes)
- Do not disconnect power or USB during flashing
- When complete, you’ll see a success message
Step 5: Complete initial setup
Section titled “Step 5: Complete initial setup”- Power off the device
- Remove the microSD card
- Disconnect the USB-C cable from the Ubuntu host
- Reattach the device lid if desired
The initial SPI bootloader setup is now complete. You only need to perform this once.
Part 2: Install PhyOS
Section titled “Part 2: Install PhyOS”Once the SPI bootloader is flashed (or if you’re performing a repeat installation), you can now install PhyOS to the device’s internal drive.
Download and prepare installation media
Section titled “Download and prepare installation media”- Download the latest PhyOS installer for Advantech MIC-711-ON-3A1
- Write the PhyOS image to a microSD card using Balena Etcher or Raspberry Pi Imager
Install PhyOS to internal drive
Section titled “Install PhyOS to internal drive”- Power off the Advantech MIC-711 completely and disconnect power
- Insert the prepared microSD card into the device
- Connect your HDMI display or DisplayPort monitor
- Connect a USB keyboard (required for installation)
- Reconnect power to perform a cold boot
- Immediately press F11 at startup to open the boot menu
- Select the SD card from the boot menu using arrow keys
- Press Enter to boot from the SD card
- Follow the on-screen instructions to flash the internal drive with PhyOS
- The installer will guide you through the process
- This writes PhyOS to the device’s internal storage
- Wait for the installation to complete
- When prompted that installation is successful, power off the device
- Disconnect power and remove the microSD card
- Reconnect power - the device will now boot PhyOS from internal storage
Connect device to PhyStack
Section titled “Connect device to PhyStack”After PhyOS boots from internal storage:
- You should see the PhyOS splash screen
- The device will display a connection screen
- Note the Serial Number displayed in the top-left corner of the screen
- In the PhyStack portal, navigate to the device connection section
- Enter the Serial Number in the Device Serial field
- Click the Connect device button
- The device will appear under Installations → Devices
Troubleshooting
Section titled “Troubleshooting”SPI bootloader flashing issues
Section titled “SPI bootloader flashing issues”APX device not visible in lsusb
Section titled “APX device not visible in lsusb”- Re-enter Recovery Mode by carefully repeating Step 3
- Ensure you hold the REC button while connecting power
- Hold the REC button for the full 5 seconds before releasing
- Ensure your USB-C cable supports data transfer (some cables are power-only)
- Try a different USB port on the Ubuntu host
- Check USB kernel logs immediately after plugging in the device:
Terminal window dmesg | tail -n 50
Cannot locate REC button
Section titled “Cannot locate REC button”- The REC button is typically located on the main board inside the device
- You must unscrew and remove the lid to access it
- Consult the device documentation or contact Advantech support for button location
- Some units may have the button labeled as “RECOVERY” or “REC”
doflash —spi-only fails
Section titled “doflash —spi-only fails”- Confirm the device is in Recovery Mode and visible as
NVIDIA Corp. APXinlsusb - Verify prerequisites are installed:
device-tree-compiler - Ensure you’re running the command from inside the extracted SPI package directory
- Confirm you’re using sudo:
sudo sh doflash --spi-only - If it still fails, capture the full error output for support
PhyOS installation issues
Section titled “PhyOS installation issues”F11 boot menu doesn’t appear
Section titled “F11 boot menu doesn’t appear”- Ensure you press F11 immediately at startup
- Try pressing F11 repeatedly during boot
- If F11 doesn’t work, the SPI bootloader may not be flashed correctly
- Verify the SPI bootloader was successfully flashed in Part 1
Device won’t boot from microSD card
Section titled “Device won’t boot from microSD card”- Ensure the SPI bootloader was successfully flashed (Part 1)
- Verify the microSD card is fully inserted
- Press F11 and manually select the SD card from the boot menu
- Try re-flashing the PhyOS image to the SD card using Balena Etcher
- Test with a different microSD card
- Check that you downloaded the ARM64 version of PhyOS for MIC-711-ON-3A1
Installer doesn’t appear after selecting SD card
Section titled “Installer doesn’t appear after selecting SD card”- Verify the PhyOS image was written successfully to the SD card
- Check that your display is connected properly
- Ensure your keyboard is connected (required for installation)
- Try a different microSD card
Installation to internal drive fails or freezes
Section titled “Installation to internal drive fails or freezes”- Ensure the device has adequate ventilation
- Check that there’s sufficient space on the internal drive
- Wait at least 15 minutes before intervening (installation can be slow)
- If it continues to fail, re-flash the SPI bootloader and try again
- Check that all internal cables are properly connected
Device-specific notes
Section titled “Device-specific notes”Installation media
Section titled “Installation media”The MIC-711-ON-3A1 uses a microSD card for PhyOS installation. The card is only required for the installation process and should be removed once PhyOS is installed to the internal drive.
Boot method
Section titled “Boot method”The MIC-711-ON-3A1 uses the F11 boot menu to select the installation media during setup.
Network configuration
Section titled “Network configuration”The Advantech MIC-711-ON-3A1 includes:
- 2x Gigabit Ethernet ports (may vary by model)
After PhyOS installation, you can configure network settings through the PhyStack console.
Display outputs
Section titled “Display outputs”The MIC-711-ON-3A1 offers multiple display outputs:
- HDMI
- DisplayPort
- Some models include additional display options
Use the output that matches your display connection.
Accessing internal components
Section titled “Accessing internal components”To access the REC button for SPI flashing or for maintenance:
- Power off the device completely
- Disconnect all cables
- Use a small screwdriver to remove the lid screws
- Carefully lift the lid to access the main board
- After completing work, reattach the lid securely
Important notes
Section titled “Important notes”- Perform SPI flashing only once on fresh devices unless explicitly instructed otherwise
- Never interrupt power during SPI flashing - this can damage the bootloader
- The SPI bootloader enables the MIC-711 to boot from the PhyOS installation
- Keep your SPI flash package in a safe location in case you need to reflash in the future
- The REC button is only needed for initial SPI flashing, not for regular PhyOS installation